
If you read our 2025 Bali entry guide and figured you were good — stop. Things have changed enough in 2026 that it’s worth a fresh read before you fly.
I’ve been doing a deep dive into the current entry process — going through first-hand reports from travellers who’ve landed at Ngurah Rai in early 2026, cross-checking with official Indonesian immigration sources, and sorting through the wave of questions that keep coming up in travel communities. What I found is that Bali airport immigration in 2026 is genuinely manageable, but only if you understand that there are two completely separate systems at play — and most people only prepare for one.
Here’s everything you need to know, updated for 2026.
Research note: This guide is based on community reports from travellers who went through Ngurah Rai Airport in early 2026, combined with official Indonesian immigration documentation. I’ll flag anything that’s still evolving.
Last updated: May 2026.
The Short Answer: What You Actually Need for Bali Entry in 2026
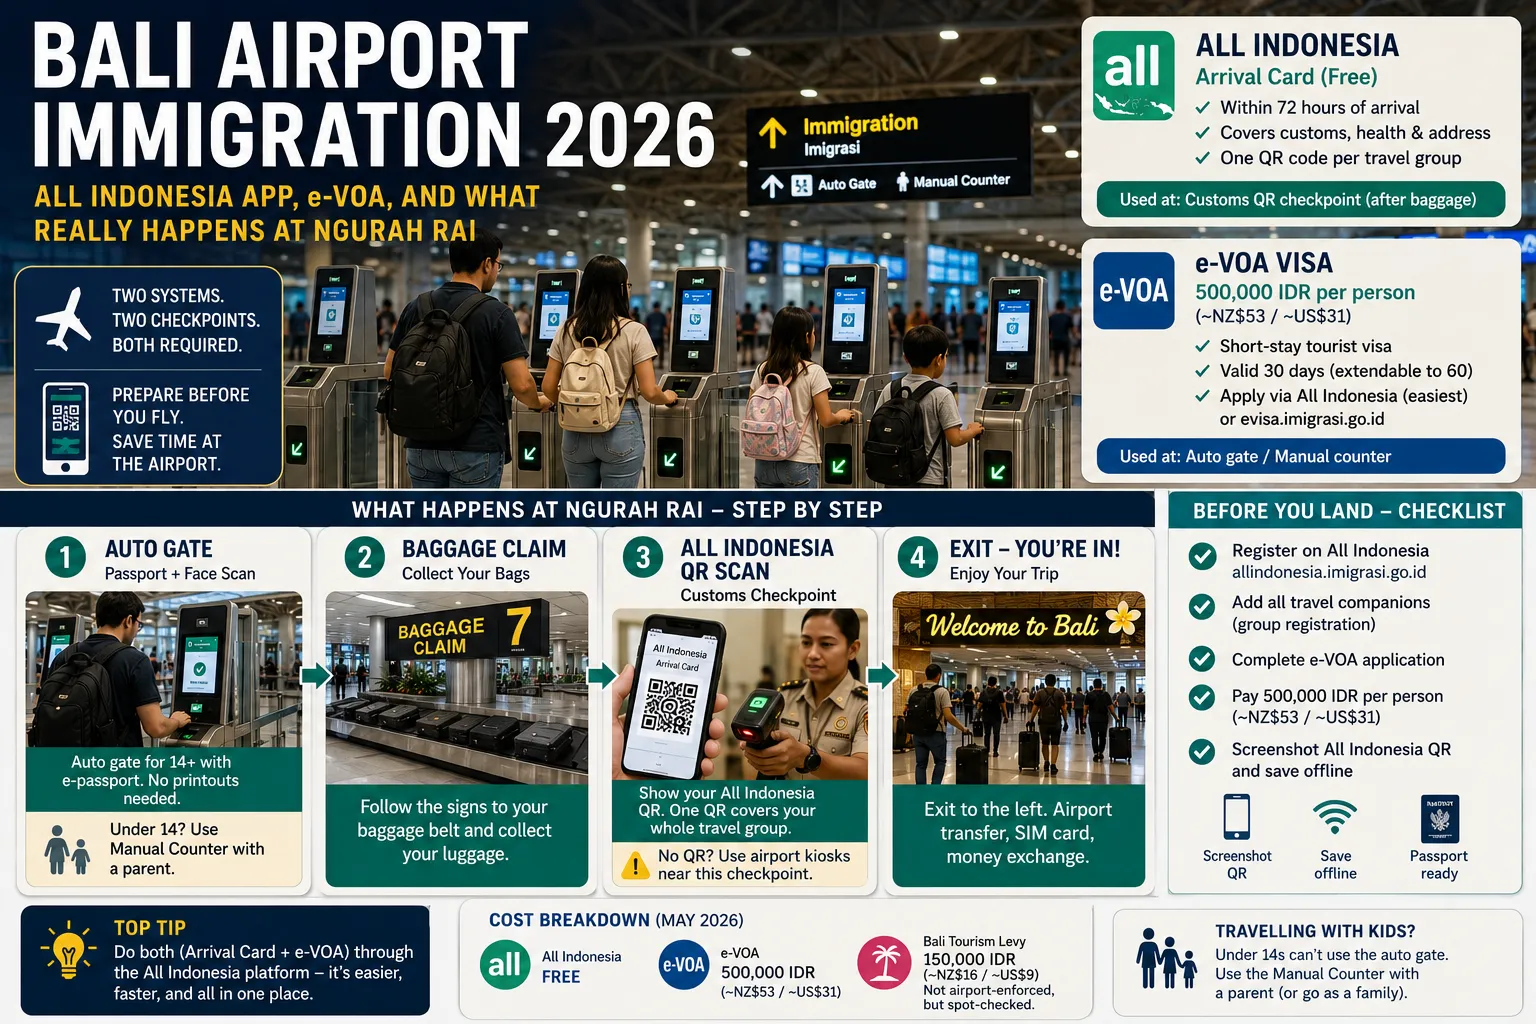
The short answer: you need two separate things before you land in Bali — an All Indonesia arrival card (with QR code) and an e-VOA visa. They are registered on different platforms and used at different checkpoints. Confusing the two is the number-one reason people get held up at the airport.
Here’s the 60-second version:
- All Indonesia (allindonesia.imigrasi.go.id) — Free. Register within 72 hours of arrival. Covers your arrival card, health declaration, and customs info. One QR code covers your whole travel group.
- e-VOA (evisa.imigrasi.go.id) — 500,000 IDR per person (~NZ$53 / ~US$31, May 2026). This is your actual visa. Apply via the All Indonesia platform (easiest) or separately via the e-VOA site. Valid 30 days, extendable to 60.
- At the airport — The auto gate uses your passport + face scan only (no printouts needed). The QR scan happens at the customs checkpoint after baggage claim. Keep your All Indonesia QR accessible on your phone.
Everything below is the detail that separates a smooth arrival from a stressed one.
What Changed Between 2025 and 2026
This is the core reason I’m writing this update. Based on 2026 traveller reports, here’s what’s meaningfully different:
The All Indonesia platform has replaced paper customs cards entirely. If you haven’t been to Bali since pre-2023, the old paper declaration card you filled in on the plane is gone. The All Indonesia QR code is now how customs clears your arrival — and you need to register before you land, not on the plane.
The auto gate is now the primary immigration pathway. Travellers with a valid e-VOA pre-registered go straight through the auto gate using passport scan and face recognition — no officer, no stamping, no queue. This is a significant improvement from the 2025 experience when the auto gate was less consistently applied.
The All Indonesia platform now also handles e-VOA applications. Previously, most guides (including ours) suggested going directly to the e-VOA site. In 2026, the All Indonesia platform integrates both the arrival card and visa application in a single flow, which is noticeably easier than the separate e-VOA site.
The Bali tourism levy is still not airport-enforced, but spot checks have started. More on this in the FAQ below.
Why This Confuses So Many People
Before 2023, arriving in Bali meant filling out a paper customs card on the plane. Everyone got one, everyone filled it out, done.
The All Indonesia platform replaced that. It’s a single digital system for your arrival declaration — covering customs, health screening, and your address in Indonesia — all wrapped up in one QR code.
Here’s the thing that catches travellers: All Indonesia is not your visa. It looks official. It generates a confirmation email. You get a QR code. So it’s easy to assume you’ve handled everything when you’ve only handled half of it.
The e-VOA is your visa. It’s a separate payment, a separate process. You can apply for it through the All Indonesia platform (recommended), or through the dedicated e-VOA site if you want to apply more than 72 hours before travel.
All Indonesia vs e-VOA: The Full Comparison
| All Indonesia | e-VOA (Electronic Visa on Arrival) | |
|---|---|---|
| What it is | Arrival card (customs + health + address) | Short-stay tourist visa |
| Required? | Yes — every arriving passenger | Yes — all foreign nationals |
| Cost | Free | 500,000 IDR/person (~NZ$53 / ~US$31) |
| When to apply | Within 72 hours before arrival | Up to 90 days before (or pay on arrival) |
| Who applies | One group representative | Each person individually |
| What you get | One QR code per travel group | Individual e-VOA per passport |
| Used where | Customs QR checkpoint (after baggage) | Auto gate / Manual counter |
| Stay duration | N/A | 30 days, extendable once to 60 days |
| Website | allindonesia.imigrasi.go.id | evisa.imigrasi.go.id or via All Indonesia |
Bottom line: All Indonesia = your arrival paperwork. e-VOA = your right to enter. You need both. They’re used at different points in the airport.
💡 Recommended approach: Do both through the All Indonesia platform in one session. The e-VOA site requires more document uploads (photos in specific JPG/PDF formats, etc.) and is notably more fiddly. The All Indonesia route handles everything with minimal preparation beyond your passport.
Step-by-Step: What Actually Happens at Ngurah Rai
This is the sequence reported by travellers who cleared immigration in early 2026. Walk through it once before you fly.
Step 1: Auto Gate — Passport + Face Scan
The first checkpoint after deplaning is the immigration auto gate — a row of colour-coded automated booths where you scan your passport and complete a face recognition check. This is where your e-VOA is verified automatically.
No printouts. No showing anything on your phone. Just your passport.
If your e-VOA is correctly registered (whether through All Indonesia or the e-VOA site), the gate opens. It’s reported as quick and consistent in 2026.
⚠️ If you’re travelling with children under 14: The auto gate requires passengers to be 14 years or older with an electronic passport. Younger children cannot use it — they go to the Manual Counter with a parent. Other adults in your group can clear the auto gate and wait on the other side. Or you can all go to the Manual Counter together — slower, but keeps the family in one place.
If your e-VOA isn’t pre-registered, you’ll be directed to pay at the VOA counter before this point. It works, but queue times are unpredictable — anywhere from five minutes to 45+ depending on the flight load.
💡 Manual Counter tip: If you’re going through the Manual Counter, have your individual e-VOA confirmation visible (screenshot or printout). The auto gate only needs your passport, but counter officers may ask to see the visa document.
Step 2: Baggage Claim
Standard. Follow signs, find your belt number, collect bags. Nothing to prepare here.
Step 3: All Indonesia QR Scan — Customs Checkpoint
This is the step that catches most people, because it doesn’t happen at immigration — it happens after baggage claim, on the way to the exit.
As you walk toward the exit doors, airport officers with handheld QR readers check your All Indonesia QR code — your arrival card, not your visa. One code per travel group covers everyone registered under that application.
Reports from early 2026 describe this checkpoint as fast-moving. The officer scans your QR and you’re through. Don’t pull out your e-VOA printout here — they don’t need it.
⚠️ If you haven’t registered yet: You can fill in the All Indonesia form at airport kiosks near this checkpoint. It won’t stop you from entering, but it slows you down. The straightforward move is to sort it before you fly.
QR access tip: The All Indonesia system sends your QR confirmation by email. Open that email on your phone, screenshot the QR, and save it somewhere you can access offline (camera roll, notes app). Brightness all the way up. A photo taken of your computer screen sometimes won’t scan — use a direct screenshot from your email instead.
Step 4: Exit
Once you clear the customs checkpoint, you’re out. Exit is to the left. Your airport transfer, SIM card pickup, or money exchange is right through those doors.
If you’ve pre-booked a transfer, your driver will be in the arrivals hall with a name sign. Our Bali airport transfer guide covers how to book, what to avoid, and what to expect from the pickup.
How to Register on All Indonesia (Before You Fly)
Registration opens 72 hours before your Indonesian arrival date. Here’s what the process looks like:
- Go to allindonesia.imigrasi.go.id
- Create an account and log in
- Select “Individual” or “Group” — group if you’re travelling with family. One person registers as group representative and adds other members.
- Enter passport details for every person. Check every character carefully. A typo means a reissue and another 500,000 IDR per person.
- Complete the health declaration and customs information
- Apply for e-VOA at the same time (recommended — saves doing it separately)
- Pay the visa fee — 500,000 IDR per person (~NZ$53 / ~US$31)
- Receive QR code confirmation by email
⚠️ Known issues reported in early 2026:
- The MRZ automatic passport scanner sometimes fills in data incorrectly. Always manually verify the auto-filled passport number, name, and date of birth before submitting.
5 Mistakes to Avoid at Bali Airport Immigration
These are the most common problems reported from travellers who went through Ngurah Rai in early 2026.
1. Treating the All Indonesia QR as your visa
The All Indonesia QR is your arrival card (customs + health). Your e-VOA is your visa. Different systems, different checkpoints. At the auto gate: passport only. At customs: All Indonesia QR only. Mixing them up confuses the process.
2. Trying to register All Indonesia too early
The 72-hour window is based on your arrival date in Bali in WITA timezone (UTC+8). Try to register earlier and your travel date won’t appear in the system. For New Zealand travellers — especially those doing overnight or multi-leg flights — do your All Indonesia registration the evening before your departure, NZ time. That usually puts you comfortably inside the 72-hour window.
3. Assuming the auto gate works for everyone in your group
Children under 14 can’t use it. Plan for a Manual Counter visit if you’re travelling with young kids. Knowing this before you land means no last-minute scramble.
4. Saving the QR in a way that won’t scan
The email confirmation contains your QR. Screenshot it directly from your phone’s email app. Save it to your camera roll. Don’t rely on photographing a computer screen — the resolution usually doesn’t scan cleanly at the handheld reader. Test that you can open it offline before you board.
5. Leaving the e-VOA until the airport
The on-arrival VOA option exists and works. But queue times at the VOA counter are genuinely unpredictable — some travellers clear it in five minutes, others have waited 45. Pre-registering costs the same and skips all of that.
Cost Breakdown: What Does Bali Entry Cost in 2026?
| Item | Cost per person | Notes |
|---|---|---|
| All Indonesia registration | Free | Mandatory for all arrivals |
| e-VOA (pre-registered online) | 500,000 IDR (~NZ$53 / ~US$31) | Per passport, paid before travel |
| VOA (paid on arrival) | 500,000 IDR (~NZ$53 / ~US$31) | Same price, longer potential queue |
| Bali tourism levy | 150,000 IDR (~NZ$16 / ~US$9) | Not airport-enforced, but increasingly spot-checked at tourist sites |
Prices verified May 2026. IDR/NZD/USD rates fluctuate.
For a family of four, the e-VOA fees alone come to 2,000,000 IDR (~NZ$212 / ~US$124). Factor this into your pre-trip budget — it’s a fixed cost before you even land.
Travelling with Kids: The Manual Counter Flow
The auto gate requires passengers to be 14 or older with an electronic passport. This is the main thing that changes the process for families with younger children.
In practice: one parent takes the under-14s to the Manual Counter. Other adults in the group clear the auto gate and wait on the other side. Alternatively, the whole family goes through the Manual Counter together — slower, but no splitting up.
At the Manual Counter, have ready:
- Each person’s passport
- Individual e-VOA confirmation (screenshot is fine)
The All Indonesia QR checkpoint (customs, after baggage) works the same for everyone — one group QR, one scan, done.
FAQ: Bali Airport Immigration 2026
Do I need to print my e-VOA to enter Bali?
No. The auto gate verifies your e-VOA automatically via passport scan — no printout required. If you go through the Manual Counter (children under 14, or if the auto gate has an issue), the officer may ask to see the e-VOA confirmation. A screenshot on your phone is sufficient, but a printout is useful as backup.
Can I do All Indonesia and the e-VOA on the same platform?
Yes. The All Indonesia platform (allindonesia.imigrasi.go.id) handles both your arrival card and the e-VOA visa application in one flow. This is the recommended approach for 2026. The separate e-VOA site (evisa.imigrasi.go.id) is only worth using if you want to apply more than 72 hours before arrival.
How does one QR code cover a whole family?
The All Indonesia group registration lets one person act as representative for the whole travel party. Everyone in the group is registered under that single QR code, which is scanned once at the customs checkpoint on exit from the baggage hall. Visas (e-VOA) are individual — each passport pays and receives its own.
What if I arrive without registering on All Indonesia?
Airport kiosks near the customs checkpoint allow on-the-spot registration. It won’t block your entry, but it does slow you down — and the kiosk area can get crowded after large flights. Registering before you travel is easier and faster.
Is the Bali tourism levy mandatory in 2026?
The 150,000 IDR levy (~NZ$16 / ~US$9) is not checked at the airport immigration checkpoint. However, traveller reports from late 2025 and early 2026 indicate that random spot checks at popular tourist sites have started. It’s a small amount — paying it in advance via the official Bali tourism website is lower-effort than being stopped mid-trip.
Flying from New Zealand — when should I register All Indonesia?
Register no earlier than 72 hours before your Indonesian arrival time (WITA, UTC+8). For most NZ routes with a stopover in Melbourne or Singapore, the practical approach is to register the evening before your NZ departure. That usually lands you comfortably inside the 72-hour window without cutting it too close.
Related Guides
Planning the full trip? These are worth reading:
- Bali Entry Requirements 2025 — what changed that year
- Bali Airport Transfer Guide for Families
- Bali Family Trip Mistakes — the honest version
Final Checklist: Before You Land in Bali (2026)
72 hours before your Indonesian arrival (WITA time):
- [ ] Register on All Indonesia — allindonesia.imigrasi.go.id
- [ ] Add all travel companions to the group registration
- [ ] Complete e-VOA application through the same platform
- [ ] Pay 500,000 IDR per person for e-VOA (~NZ$53 / ~US$31)
- [ ] Screenshot the All Indonesia QR — save offline in your camera roll
At the airport:
- [ ] Auto gate — passport + face scan (14+ with e-passport)
- [ ] Manual Counter — under 14s + accompanying adult
- [ ] Baggage claim — collect bags
- [ ] Customs QR checkpoint — show All Indonesia QR (one per group)
- [ ] Exit — transfer, SIM, exchange
The 2026 process is smoother than it was in 2025 — the digital infrastructure is more consistent, and the All Indonesia platform genuinely makes the visa-plus-arrival-card flow easier. Sort both before you fly, keep the QR accessible offline, and the airport is the least stressful part of your Bali trip.
Journey smarter.